I can't afford a 22 € nail polish, but every time I see Paradoxal I'm more than tempted.
I'm so excited that I couldn't wait Monday to show this. This morning I create my personal Chanel Paradoxal, and here's the recipe for you!
Ragazze, è tantissimo che non aggiorno, ma oggi non potevo non farlo, sono eccitatissima per la mia ultima creazione. Stamattina ho deciso di impegnarmi in cose utilissime, e visto che non posso permettermi uno smalto da 22 euro, mi sono autofatta il mio Paradoxal.
WHAT YOU NEED:
You need a shimmer puple/berry, a creme white, a black and some drops of a taupe polish.
Here they are. Ow, and an empty bottle, of course.
Vi serve un violetto shimmer, un bianco crema, un nero crema e qualche goccia di uno smalto taupe. E ovviamente una bottiglietta vuota.

I first made some attempts on a plastic bag in order to understand if the colors I chose would fit my purpose.
Prima ho fatto delle prove su una professionalissima busta di plastica per vedere se i colori scelti avessero un senso.

Ok, let's create our Paradoxal with dollar store polishes:
Okay, facciamoci il nostro personalissimo Paradoxal!
1. pour some purple polish into the empty bottle, here you can see how much I used (I didn't make a full bottle of paradoxal dupe, though! If you want to have more just increase the ingredients!).
1. versate un po' di smalto viola nella bottiglia vuota, per darvi un'idea di quanto ne ho messo guardate la foto (non ho fatto una bottiglia intera di smalto, ne ho fatta poco meno di metà, se ne volete di più aumentate le dosi!)

2. add 2 drops of white (it's just to give a creme effect, the color isn't going to change a lot!)
2. aggiungete 2 gocce di bianco, non cambierà il colore ma è utile per dare l'effetto coprente e togliere quello traslucido al viola.
3. add 3 or 4 drops of taupe polish. I'm not sure if it is absolutely necessary, but I put it in as well.
3. aggiungete 3 o 4 gocce di taupe, non sono sicura che sia indispensabile, io l'ho messo...
4. add black polish until you have the desired shade. I can't tell how much black I put exactly because I put it in drop by drop and didn't count them. Bit if you add some, and then shake, you see how much you need. So 3 drops and shake, look, and if you need, add 3 drops and shake, look, and add until you have the correct shade.
4. aggiungete il nero fino ad ottenere il colore desiderato. non so dirvi con precisione quanto perchè ho fatto mille rabbocchi, però se versate 3 gocce alla volta, scuotete la bottiglia e guardate il colore ottenuto, vi rendete conto di quanto ve ne serve ancora. Quindi, 3 gocce, mescolare, guardare e aggiungere finchè non ci siete con la tonalità.
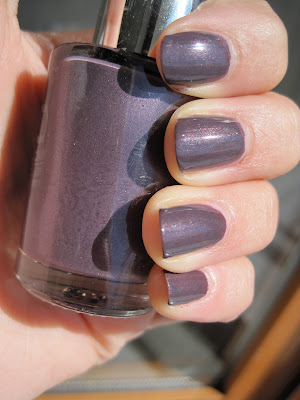
5. wear your franken proudly, you just spent 4 euros instead of 22 :)
5. indossate con fierezza la vostra creatura, complimentandovi per aver speso 5 euro (ma nemmeno) invece che 22!
Hope you enjoy my DIY, if you try please let me see your pics!
Spero di esservi stata utile, e se decidete di tentare fatemi vedere le vostre foto! :)
5 commenti:
Che idea fantastica! *-*
Spendere 22 euro per me è assurdo, ed ero alla ricerca di un DUPE ma così è ancora meglio! Proverò. Grazieeee
Ma è splendido!!!
Mi rendo conto solo ora che la foto non rispecchia il reale colore dello smalto... comunque rende l'idea :)
wow :D
Sei stata davvero brava :)
Posta un commento